A playground for the boys
Today's special: Free domain name and DNSSEC!
Disclaimer: First article, hopefully my prose is not too bad. I’m sorry it’s a bit long. I decided to tell this short story, because I struggled a bit to correctly setup my EU.org domain name and I realized I was probably not the first in this situation. Enjoy!
I have always wanted to have my own domain and website to play with. One can easily find out it is possible to host a website with self-signed certificates for free, but I always believed domain names were a mandatory non-free step, and I eventually gave up and got a domain from G-company.
My friend Mcdostone introduced me to EU.org, which gives to people like you and me the opportunity to get our own domain names for free. This story describes the process I had to go through in order to get a fully working domain name with EU.org.
Menu
Prerequisites
I will not cover how to:
- run a web server on a local host;
- do port forwarding on your router;
- get free SSL certificates signed by a CA (check out certbot).
I am running a very simple Flask web server on a Raspberry PI 4, available at http://inteam.eu.org.
Request the domain name
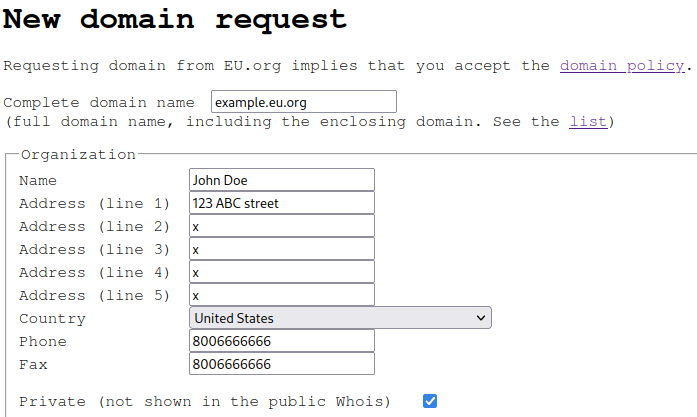
First thing I had to do was to create an account. It is quick and simple, they ask for basic information that will be used later when requesting a domain name. They ask for a fax number (really?) and five address lines, and I unfortunately have only one. Felt discriminated but anyway.
After registering, I requested a domain name. Most of the fields were already filled, and I basically only had to choose my domain name. EU.org offers a lot of subdomains. Make sure you read EU.org policy to determine whether or not your project is compatible with their rules.

Domain's organization information.
A point to note here is the Name servers form. I am not an expert, so I just
opted for their recommended option for correctness.
Finally, I added my domain name next to Name1, and the public IP address
of my web server next to IP1.

Third checkbox please!
I then submitted my request! The EU.org team manually (I guess?) reviewed and
eventually approved my request. It took a few days for me, less than two weeks
IIRC. Once I got notified my domain and the appropriate records had been
created, this is what my domains list looked like, at the exception of DNSSEC:

My list of domain names.
Su-per. I’ve just got my first free domain name. It took a few days to spread across the DNS servers, as expected. I was regularly checking if my domain was yet resolved , and I eventually noticed a lot of DNS servers wound not resolve it. Why?
Configure DNSSEC
DNSSEC is basically a modification of the DNS protocol which improves its security by authenticating DNS exchanges, preventing spoofing. When I configured DNSSEC for my domain, I was still waiting for a response from the EU.org team, because I was surprised most of the DNS servers were still not resolving my domain name after three weeks. At this time, I did not know it would fix my issue.
I was a bit lost and started to browse around, looking for a way to add DS records to my domain. I was decided to ignore the warning from EU.org and to enable DNSSEC anyway on my domain.

All my homies hate warnings.
I eventually followed a tutorial1 which was very helpful, but I ran into a few errors which were not covered, so I will describe the full process here.
Setup a bind server
The first task was be to install and run a DNS server. On my Raspberry, I had
to install the bind9 package, which is known to be the most used DNS server
ever. No less!
# apt install bind9
[...]
Now let’s enable DNSSEC:
sudo vim /etc/bind/named.conf.options
options {
    [...]

    dnssec-enable yes;
    dnssec-validation yes;
    dnssec-lookaside auto;

    [...]
}
At this point, I forwarded my port 53 for both TCP and UDP protocols in my router configuration.
Generate and sign my keys
I want now to create two pairs of keys, the Zone Signing Key (ZSK) and the
Key Signing Key (KSK). For that, we will need the dnssec-tools package.
I’m running Arch so I have used:
$ sudo pacman -Sy dnssec-tools
[...]
Once the toolkit was installed, let’s navigate to the directory where bind
looks for the keys:
$ cd /var/cache/bindThen I generated the ZSK and the KSK:
root@pi:/var/cache/bind$ dnssec-keygen -L 3600 -a ECDSAP256SHA256 -n ZONE -f KSK example.eu.org
Generating key pair.
Kexample.eu.org.+013+22641
root@pi:/var/cache/bind$ dnssec-keygen -L 3600 -a ECDSAP256SHA256 -n ZONE example.eu.org
Generating key pair.
Kexample.eu.org.+013+28911
It created two .key and two *.private files, which are two sets of public/
private keys pairs. I need now to create a zone file, which is the file I
will sign. You will have to replace <IP>, <EMAIL> and the filenames with
your appropriate values.
for key in `ls Kexample.eu.org*.key`
do
  echo "\$INCLUDE $key">> example.eu.org.zone
done
echo "example.eu.org.   IN  A   <IP>" >> example.eu.org.zone
echo "@ IN  SOA example.eu.org. <EMAIL> (3 604800 86400 2419200 604800)" >> example.eu.org.zone
echo "  IN  NS  example.eu.org." >> example.eu.org.zone
Note: <EMAIL> is the email I registered with when requesting the domain
name, but the @ symbol becomes a . and all . previous to the @ should be
escaped. And you also end it with a last .. For instance:
exa.mple@example.eu.org turns into exa\.mple.example.eu.org..
I could finally sign this fifth file, using dnssec-signzone:
root@pi:/var/cache/bind$ dnssec-signzone -A -3 $(head -c 1000 /dev/random | sha1sum | cut -b 1-16) -N INCREMENT -o example.eu.org -t example.eu.org.zone
Verifying the zone using the following algorithms:
- ECDSAP256SHA256
Zone fully signed:
Algorithm: ECDSAP256SHA256: KSKs: 1 active, 0 stand-by, 0 revoked
                            ZSKs: 1 active, 0 stand-by, 0 revoked
example.eu.org.zone.signed
Signatures generated:                        7
Signatures retained:                         0
Signatures dropped:                          0
Signatures successfully verified:            0
Signatures unsuccessfully verified:          0
Signing time in seconds:                 0.003
Signatures per second:                2100.210
Runtime in seconds:                      0.016
Note that we use a random salt here.
At this point, I needed to tell bind to use the new file
example.eu.org.zone.signed:
sudo vim /etc/bind/named.conf.local
zone "example.eu.org" IN {
    type master;
    file "example.eu.org.zone.signed";
    allow-transfer { 2.2.2.2; };
    allow-update { none; };
};
I finally reloaded bind service with sudo systemctl reload bind9. I checked
if everything went fine using dig:
root@pi:/var/cache/bind$ dig DNSKEY example.eu.org. @localhost +multiline
;; Truncated, retrying in TCP mode.

; <<>> DiG 9.8.4-rpz2+rl005.12-P1 <<>> DNSKEY example.eu.org. @localhost +multiline
;; global options: +cmd
;; Got answer:
;; ->>HEADER<<- opcode: QUERY, status: NOERROR, id: 43986
;; flags: qr aa rd; QUERY: 1, ANSWER: 2, AUTHORITY: 0, ADDITIONAL: 0
;; WARNING: recursion requested but not available

;; QUESTION SECTION:
;example.eu.org.       IN DNSKEY

;; ANSWER SECTION:
example.eu.org.    86400 IN DNSKEY   256 3 7 (
                AwEAActPMYurNEyhUgHjPctbLCI1VuSj3xcjI8QFTpdM
                8k3cYrfwB/WlNKjnnjt98nPmHv6frnuvs2LKIvvGzz++
                kVwVc8uMLVyLOxVeKhygDurFQpLNNdPumuc2MMRvV9me
                fPrdKWtEEtOxq6Pce3DW2qRLjyE1n1oEq44gixn6hjgo
                sG2FzV4fTQdxdYCzlYjsaZwy0Kww4HpIaozGNjoDQVI/
                f3JtLpE1MYEb9DiUVMjkwVR5yH2UhJwZH6VVvDOZg6u6
                YPOSUDVvyofCGcICLqUOG+qITYVucyIWgZtHZUb49dpG
                aJTAdVKlOTbYV9sbmHNuMuGt+1/rc+StsjTPTHU=
                ) ; key id = 40400
example.eu.org.    86400 IN DNSKEY   257 3 7 (
                AwEAAa2BE0dAvMs0pe2f+D6HaCyiFSHw47BA82YGs7Sj
                qSqH3MprNra9/4S0aV6SSqHM3iYZt5NRQNTNTRzkE18e
                3j9AGV8JA+xbEow74n0eu33phoxq7rOpd/N1GpCrxUsG
                kK4PDkm+R0hhfufe1ZOSoiZUV7y8OVGFB+cmaVb7sYqB
                RxeWPi1Z6Fj1/5oKwB6Zqbs7s7pmxl/GcjTvdQkMFtOQ
                AFGqaaSxVrisjq7H3nUj4hJIJ+SStZ59qfW3rO7+Eqgo
                1aDYaz+jFHZ+nTc/os4Z51eMWsZPYRnPRJG2EjJmkBrJ
                huZ9x0qnjEjUPAcUgMVqTo3hkRv0D24I10LAVQLETuw/
                QOuWMG1VjybzLbXi5YScwcBDAgtEpsQA9o7u6VC00DGh
                +2+4RmgrQ7mQ5A9MwhglVPaNXKuI6sEGlWripgTwm425
                JFv2tGHROS55Hxx06A416MtxBpSEaPMYUs6jSIyf9cjB
                BMV24OjkCxdz29zi+OyUyHwirW51BFSaOQuzaRiOsovM
                NSEgKWLwzwsQ5cVJBEMw89c2V0sHa4yuI5rr79msRgZT
                KCD7wa1Hyp7s/r+ylHhjpqrZwViOPU7tAGZ3IkkJ2SMI
                e/h+FGiwXXhr769EHbVE/PqvdbpcsgsDqFu0K2oqY70u
                SxnsLB8uVKYlzjG+UIoQzefBluQl
                ) ; key id = 62910

;; Query time: 0 msec
;; SERVER: 127.0.0.1#53(127.0.0.1)
;; WHEN: Wed Nov 27 18:18:30 2013
;; MSG SIZE  rcvd: 839
Everything looked good so far.
Submit DS records
Now that my DNS server was running, I needed to give EU.org my public keys so it
could finally enable DNSSEC. Back to DNSSEC configuration of my domain, I added
my DS records. They are actually the last line of the *.key files I generated
earlier:
root@pi:/var/cache/bind$ cat *.key
; This is a key-signing key, keyid 24582, for example.eu.org.
; Created: 20220715005917 (Thu Jul 14 20:59:17 2022)
; Publish: 20220715005917 (Thu Jul 14 20:59:17 2022)
; Activate: 20220715005917 (Thu Jul 14 20:59:17 2022)
example.eu.org. 3600 IN DNSKEY 257 3 13 aGYV9tajrYYURYCvdTte4yvRJOgTlTSnuhHoXcGo5e+fMhcpvgvQzb+m E/EVDfquZLnVZbjrprFgqlmFsvjd8Q==
; This is a zone-signing key, keyid 62537, for example.eu.org.
; Created: 20220715005913 (Thu Jul 14 20:59:13 2022)
; Publish: 20220715005913 (Thu Jul 14 20:59:13 2022)
; Activate: 20220715005913 (Thu Jul 14 20:59:13 2022)
example.eu.org. 3600 IN DNSKEY 256 3 13 8wsphstJI+JVEih2myGoqyvXjTQ0vU67rm9Os06G8ZGyao8GyHDzl4Tz fyBsHqW8D6ifKlmDjro5y7d4IivrgA==
All lines starting with `;` are comments and should be ignored.
The line with the 257 has to be the primary DS record, so I added it first.
and then the second one.
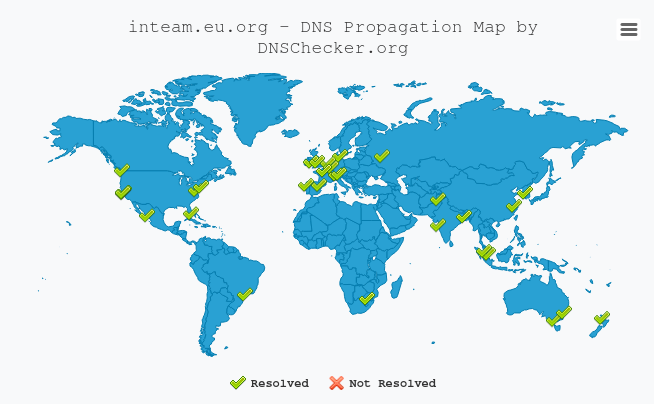
Again, it may take a few minutes for changes to take effect, but it looked like it had been instantly processed for me. As soon as I submitted these records, I checked again if major DNS servers were now resolving my domains:

After a month of big sad, big joy was here.
There are also tools like DNSViz to make sure DNSSEC has properly been enabled.
Avoid Zone Walking attacks
I’m not sure if this is really necessary but the article I followed considered
important to teach how to protect ourselves from Zone Walking attacks. From
what I understand, this attack is difficult but not impossible, and may allow
one to get unauthorized access to our resource records by requesting DNS servers
and by trying to revert hashes. To address this issue, it is recommended to
update the salt that we used when signing our zone file. This script
2 will automatically refresh the salt of our signed zone
file, and can easily be automated using cron:
$ sudo crontab -e
0 0 * * 0 /path/to/zonesigner.sh example.eu.org example.eu.org.zoneDon't forget to chmod this script!
This will refresh the salt every week for you.
End of the story
Thanks for reading this short story! I took me a bit of trial and errors to get there, but I really enjoyed tinkering with DNSSEC, and as always it feels good to learn something new. Now that my site is available for everyone, I gave access on my Raspberry to my friends and created them a user, so they can play with the website as they want.
The next story you don’t want to miss will probably be realized on Mcdostone’s blog! Cya <3
Resources
Here are all the documents that helped me through this: